- Pre-Unfolding Operations
- Reduce editing work by specifying materials
- Quick Edge Selection
- Adjust 3D View’s Rotation Center
- Change the display style of the 3D model
- Create Smooth Surfaces
- Create a pattern with all faces separated
- Pattern Editing (Basic: Selecting, Moving, and Rotating Parts)
- Understand the mechanism for rectangular selection and moving of parts
- Easily switch between selected objects and full sheet view
- Change the display style of selected parts
- Efficient Angle Adjustment
- Quickly align parts
- Move parts when [Join/Disjoin Faces] mode
- Pattern Editing (General)
- Quickly import images and text by file drop
- Fit the display area to show where to glue parts together
- Check the correspondence between 2D and 3D
- Create a pattern without glue tabs
- Set the initial arrangement of glue tabs
- Separate and join faces in the 3D window
- Add Outline Padding
- General
Reduce editing work by specifying materials
The initial layout of the pattern is grouped by materials. Pre-specifying different material settings for parts in 3D software can reduce the workload during pattern editing.

Quick Edge Selection
You can specify the locations you want to cut before unfolding.
Select [3D Model] → [Edit Mode] → [Specify Cutline Edges]. You can select edges one by one with a left-click, but double-clicking allows you to specify consecutive edges at once.
You can also change the selection method to [Edges Between Two Points] through [3D Model] → [Edge Selecting].
Adjust 3D View’s Rotation Center
You can rotate the 3D model with left and right drags of the mouse, but right-dragging makes the place where the mouse is pressed the center of rotation. Use [3D Model] → [Reset Model View] to revert it.
※ You can pan the 3D model by dragging with the mouse wheel.
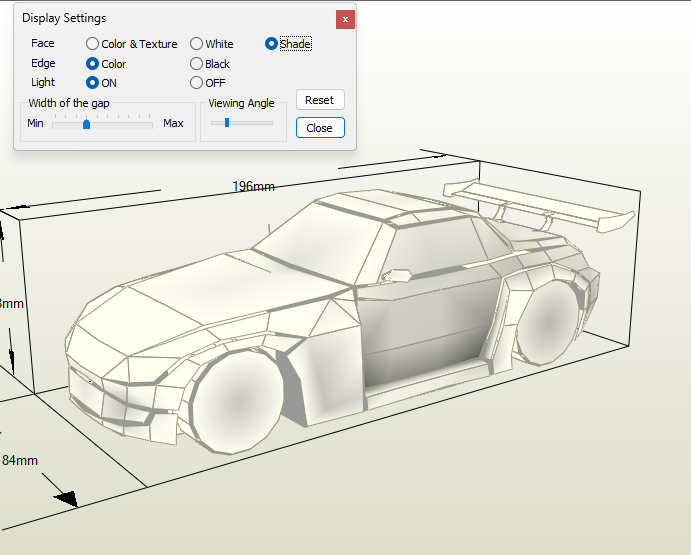
Change the display style of the 3D model
You can change the display style of the 3D model in [3D Model] → [View Setup]. The screen below shows the [Shade] option selected.
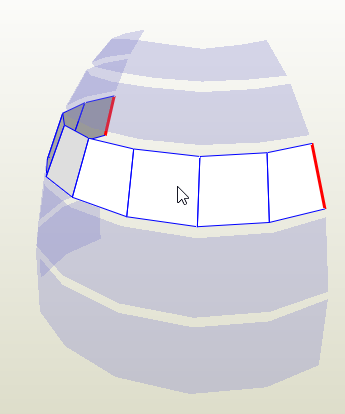
Create Smooth Surfaces
Select [3D Model] → [Edit Mode] → [Subdivide Edges and Make Them Smooth], and specify pairs of parallel edges to create smooth surfaces.
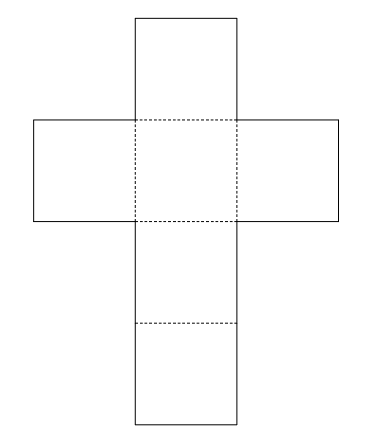
Create a pattern with all faces separated
If you want a pattern with all surfaces separated, execute [3D Model] → [Separate All Faces] before unfolding. This is useful for making models with styrene board, etc.
Understand the mechanism for rectangular selection and moving of parts
You can rectangularly select parts with a left drag of the mouse. Be aware that the selection mode differs depending on whether you draw the rectangle from the left or right.
-
- If drawn from the left: Only parts fully enclosed by the rectangle are selected
- If drawn from the right: All parts that the rectangle touches in any part are selected
You can select multiple parts by left-clicking with the [Ctrl] or [Shift] key pressed. The operation differs after selecting, based on whether you drag while pressing a key.
-
- If multiple selected with [Ctrl]: You can add to the selection by dragging.
Easily switch between selected objects and full sheet view
You can easily switch between displaying selected objects and the entire sheet in full view by shortcuts ([F4] and [F3].)
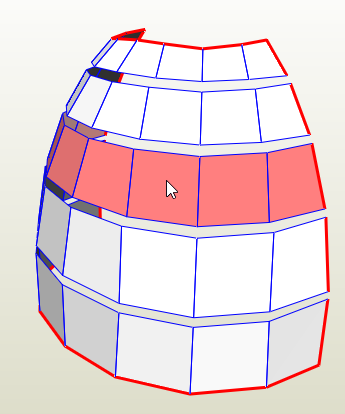
Change the display style of selected parts
You can change the display style of selected parts by turning on the option [Appearance] - [Highlight selected face in Red] in [Settings] - [Others] - [Properties].
 →
→ 
Efficient Angle Adjustment
When editing the pattern, double-clicking an edge will automatically adjust the part so that the edge aligns vertically or horizontally.
Quickly align parts
After selecting multiple parts with [Ctrl]+left-click in the 3D window, pressing the align parts button will align the parts in the order they were selected.
Move parts when [Join/Disjoin Faces] mode
When an arrow is displayed in [Join/Disjoin Faces] mode, press the [Shift] key to move parts by dragging.
Quickly import images and text by file drop
You can quickly import image files or text files (UTF-8) onto the pattern by dropping them into the Pepakura Designer window. If there are blank lines in the text, it will be split into multiple text objects.
Fit the display area to show where to glue parts together
During operations to separate and join faces, the gluing destination is indicated by a green arrow. Pressing the [Space Key] adjusts the display area to fit the entire arrow on screen.
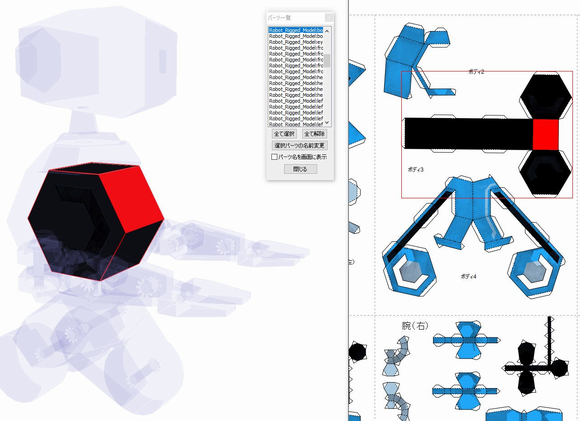
Check the correspondence between 2D and 3D
Selecting [2D Layout] → [Edit Mode] → [Check 2D and 3D Correspondence] allows you to verify the position of parts during assembly. You can click on a face in either 3D or 2D. Double-clicking allows you to check on a per-face basis. Unselected faces are displayed semi-transparently.
Create a pattern without glue flaps
Unchecking [Show Flaps] in the [2D Layout] allows you to create a pattern without glue flaps.
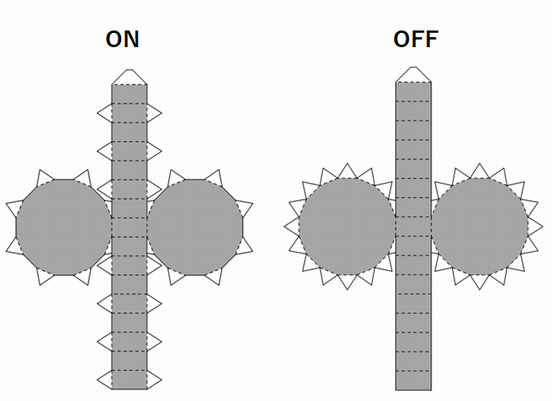
Set the initial arrangement of flaps
Checking [Alternate initial flap placement] in [Settings] → [Others] → [Properties] allows you to change the method of arranging glue tabs right after creating the pattern.
Separate and join faces in the 3D Model window
The frequently used operation of separating and joinning faces can be performed not only on the pattern side but also on the 3D model side.
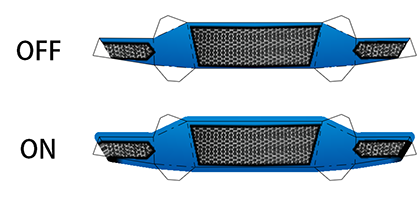
Add Outline Padding
Selecting [2D Layout] → [Add Outline Padding] when printing a pattern with textures or colors allows for a slight overflow of color outside the parts' edges. This ensures a clean finish even if cutting deviates slightly during assembly.
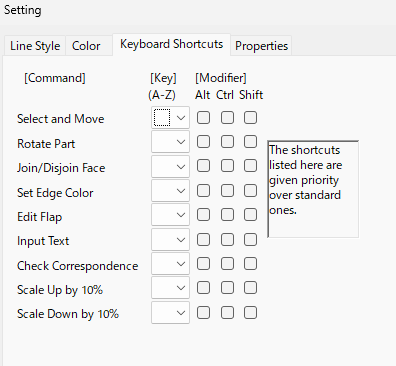
Utilize the keyboard
In the 3D model window, you can rotate the 3D model using the arrow keys. With parts selected in the pattern, you can move them with the arrow keys. Holding down the [Ctrl] key while rotating parts allows for rotation in 15-degree increments. In [Settings] → [Others] → [Keybord Shortcuts], you can set shortcuts for command selection using the keyboard. Without specifying a modifier key, editing modes can be switched using a single alphabetical key.
Update 3D Model
After creating a pattern, selecting [File] → [Reload 3D Model] reloads the original 3D model file. If there are changes to the 3D model, only those parts will be updated in the pattern. This feature is convenient when modifications to the 3D model occur after pattern editing. There's also a feature that automatically follows up on file updates for the 3D model.
Display the assembly process as an animation
After creating a pattern, selecting [3D Model] → [Animation] displays the assembly process of the pattern as an animation. The actual assembly might differ as the paper can appear to penetrate through, but it offers a fun way to visualize the movements.